|
This blog post contains three different activities that you can incorporate with your Unit 10 Imagine It! “I am Brave!” lessons. They provide opportunities for students to get “plugged in” to enhance learning by using different applications on iPads to create products to represent their learning throughout the unit.
PicCollage Workstation
The first lesson is for students to create a picture collage of their fears. The students will brainstorm their fears (at least 3). They will access Google Images to find photographs of things they are afraid of. Examples: snakes, spiders, lightning, etc. Students will save the selected images to their camera roll on the iPad and use those specific images to create their picture collage. The students will use iPads to access the PicCollage application where they will upload the photos of their fears to create a collage. This will allow students to acknowledge that they have fears so they are able to better connect with the characters in the stories throughout the unit.

Before completing this task, students will need to know how to search an image on google, save images to the iPad’s camera roll. They will also need to be familiar with the PicCollage application and its feature (ie how to upload photographs from the camera roll and manipulate the pictures to create a collage). Students will also need to know how to upload an image to their student journal on SeeSaw. You will have needed to have introduced Unit 10 “I am Brave!”
For this activity, you will need PicCollage Application, Google Images, SeeSaw If you are uncomfortable giving students access to Google Images, students can draw pictures of their fears on small index cards and take a picture of them using the iPads camera. They can complete the rest of the task as stated. If your students need a refresher, click here to get a crash course in PicCollage! Click here to view the PicCollage tutorial.
If time permits or you feel students are capable, in the PicCollage application, students can label their different fears. Students will need to save their PicCollage on the iPad’s camera roll. Then students can upload the photo into SeeSaw to save in their journal to revisit for an end of the unit activity. Click here to view a quick tutorial on how to use Seesaw.
Sequencing with Book Cfreator
Now that the students have dived into the theme of Bravery and understanding the characters in the stories have fears that are relatable to them, the students are ready to move onto the second tech task! For the second activity, the students will sequence a story using first, next, then and last. The students will work in partnerships or small groups and will choose (or the teacher will designate) a story from the middle of unit 10. Students will put the main events from the story in sequential order using the terminology first, next, then, and last.
The students will first use a graphic organizer to organize their thoughts before completing their book in Book Creator. Then the students will use iPads to access the Book Creator application. Students will create a new page for each sequential step (ie “first” will be on page 1, “next” will be on page 2, etc.). Each page should contain a picture, either drawn in the Book Creator application or drawn on paper and captured by the application’s camera. Each page should also contain a sentence or two using the appropriate sequential word followed by the event from the story. By the end of the task, students should have created a book sequencing the events of the chosen story. The story will be saved and uploaded into SeeSaw posted in each group member’s journal. 
Students will need to know how to use the Book Creator application. Students will also need to know how to upload their book into the SeeSaw application. You will have needed to have read the story from Unit 10-Week 2, OR the story from Unit 10-Week 3. This link below will help refresh your mind on how to use Book Creator.
For this activity, you will need the Book Creator Application on each iPad, SeeSaw (Click the picture below to upload the SeeSaw Activity for your students’ journals). 
Click here to access a task card.
One thing that we found helpful was to go into the upload settings in Book Creator and turn off upload options so students are only able to upload to SeeSaw. (Notes, Messages, Email icons won’t appear, eliminating confusion of where to upload for students.) Be sure that your student iPads have Book Creator installed on them prior to letting them create their task. Once the books are uploaded on SeeSaw, students can review their peers’ books and make positive comments about each partnership/group creations. If students aren’t ready to create a 4-page book, they could use the Book Creator application and complete their sequential order activity on a single page. If students aren’t ready to write full sentences, they can use their photograph for each sequence page and provide single words or captions that still capture the central idea of the event. If you’re interested in no-tech modifications students can create a flip booklet with first, next, then and last labeled on the front of the book. Under each flap, students could draw a picture and write a sentence or two describing the sequence of the main events in the story. Seesaw Task - Overcoming Fears
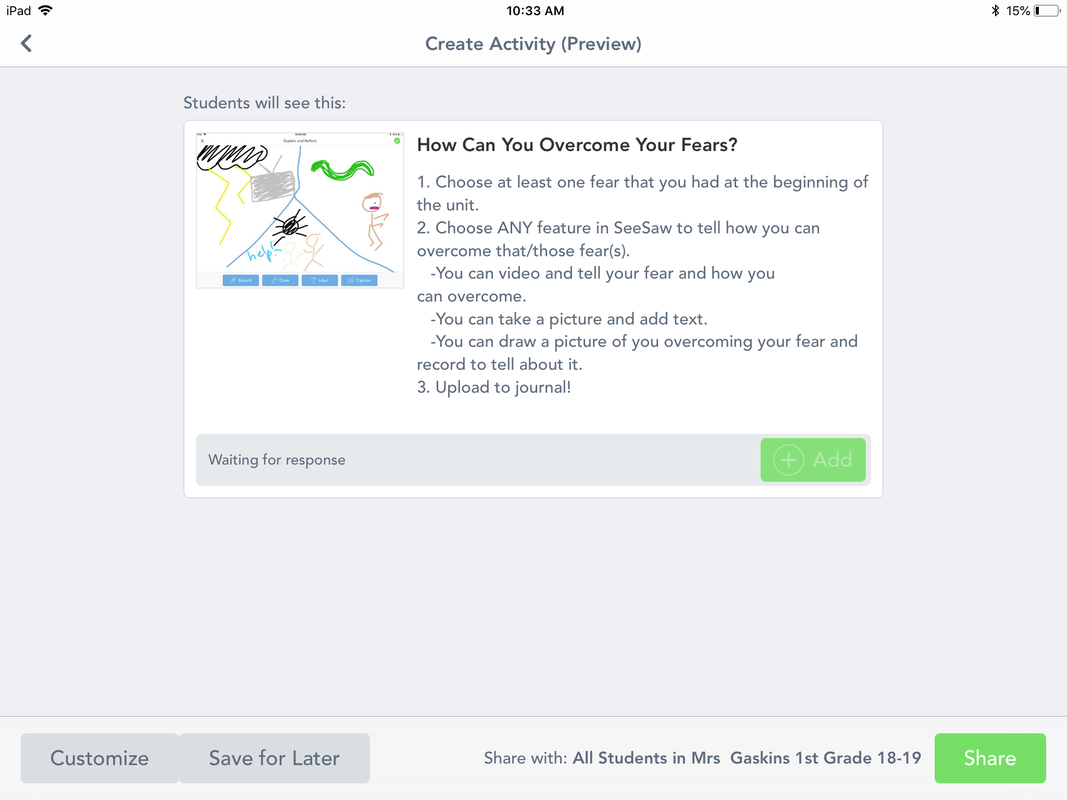
Now that you have reached the end of the year… I mean unit :)... you will wrap up the tech tasks for this unit through inquiry and student self-reflection. For the third activity, the students will summarize how to overcome fears. This activity can be completed at the end of the unit on the last inquiry day, or close to. Students will work in partnerships or small groups to discuss the ways in which the characters from the stories in the unit overcame their fears. (Allow students to use their textbooks to help joggle their memory of each story and the characters within the stories.) They will think of specific fears of the characters and how each fear was overcome. The students will then revisit their PicCollage of their fears in their journal on SeeSaw from the beginning of the unit. They will apply what they learned about overcoming fears throughout the stories in the unit to how they can overcome their own personal fear(s). The students will create a product of their choice in SeeSaw summarizing how they can overcome their fears. They will use examples from a text from the unit to support their reasoning. Example: The students can draw a picture and do a voice over, they can make a video simply summarizing their findings, etc.
(These are some examples that your students may select for their student choice activity. If you click on the picture it will take you to an already made activity in seesaw that you can just assign to your students’ journals.)
Before completing this task, students will have needed to have read and discussed the characters and their fears in all of the stories in Unit 10. Students will need to be able to access their own personal journals in SeeSaw. Students will need to be familiar with the different features within the SeeSaw application.
For this activity, students will need their Imagine It! Text Book 2 and the SeeSaw Application. Students can share summaries of how to overcome their personal fears with the class. This is the end of the unit, so by sharing their products, students will see that fears are perfectly normal to have and understand that there are ways to overcome their fears. One way students can share their fears is to use the Kagan Structure “Stand Up, Hand Up, Pair Up”. (Click for a tutorial on this Kagan Structure.) Students can take their iPads and share their product with their “pair up.” You can complete the structure 3-4 times so students are able to share with several students. 
This activity is a student choice activity. Students are able to choose the format in which they create their summary based on their own capabilities and comforts. It might be a good idea for you to review the different options SeeSaw has for the students to use for their post. This way, students have a choice and a variety of presentation will be completed. It would also be a good idea to allow students to use the noise canceling studios if they choose to create a video or audio clip so the background noises cancel out. If you don’t have access to a noise canceling studio, be sure to have a designated “quiet area” in your classroom for students to record.
If you are interested in a no-tech modification, students can revisit their construction paper/magazine picture collage. They can flip it on the back and write a summary on how they can overcome their personal fears based on the information they’ve learned throughout the different selections within Unit 10.
Standards
ELA RL 4.1, W 3.1, RL 6 Computer Science 1.DL.1.2 AuthorsJennifer Gaskins
0 Comments
Your comment will be posted after it is approved.
Leave a Reply. |


 RSS Feed
