|
This blog post contains three different activities that you can incorporate with your Unit 10 Imagine It! “I am Brave!” lessons. They provide opportunities for students to get “plugged in” to enhance learning by using different applications on iPads to create products to represent their learning throughout the unit.
PicCollage Workstation
The first lesson is for students to create a picture collage of their fears. The students will brainstorm their fears (at least 3). They will access Google Images to find photographs of things they are afraid of. Examples: snakes, spiders, lightning, etc. Students will save the selected images to their camera roll on the iPad and use those specific images to create their picture collage. The students will use iPads to access the PicCollage application where they will upload the photos of their fears to create a collage. This will allow students to acknowledge that they have fears so they are able to better connect with the characters in the stories throughout the unit.

Before completing this task, students will need to know how to search an image on google, save images to the iPad’s camera roll. They will also need to be familiar with the PicCollage application and its feature (ie how to upload photographs from the camera roll and manipulate the pictures to create a collage). Students will also need to know how to upload an image to their student journal on SeeSaw. You will have needed to have introduced Unit 10 “I am Brave!”
For this activity, you will need PicCollage Application, Google Images, SeeSaw If you are uncomfortable giving students access to Google Images, students can draw pictures of their fears on small index cards and take a picture of them using the iPads camera. They can complete the rest of the task as stated. If your students need a refresher, click here to get a crash course in PicCollage! Click here to view the PicCollage tutorial.
If time permits or you feel students are capable, in the PicCollage application, students can label their different fears. Students will need to save their PicCollage on the iPad’s camera roll. Then students can upload the photo into SeeSaw to save in their journal to revisit for an end of the unit activity. Click here to view a quick tutorial on how to use Seesaw.
0 Comments
In our unit, Home Sweet Home we learned about different types of homes and read some stories to help the students understand the Big Idea of the unit.
Types of Homes PicCollage
The first thing the students should do as they begin is Google search “Homes around the World”. Here is a tutorial on how to save a Google image you can use for a refresher for yourself or to introduce it to the kids. Then, choose 5 images of homes they find interesting and save them to the iPad camera roll. Next, they can access the images through the PicCollage app and create a collage of homes around the world.
Before you begin using PicCollage you need to make sure that the students are well versed with using Google searches, saving pictures, and have used the PicCollage app before . Each group of children will need access to an iPad and internet connection. Not all images will save easily to the camera roll, so please make sure students know to pick a different image if the one they want does not save easily. Each group can work together to make one collage or students can work individually. Below is an example of the PicCollage we created and the task card we used. 
Instead of limiting the number of pictures used, you could choose to let the children have freedom with how many they would like to use and talent them choose the grids and the sizes of the collages. The more familiar they are with the app, the better the collage will turn out. You can use the final product on your concept board for display as well. Another way to differentiate the activity and extend it would be to add content vocabulary from the lesson to each photo. The students can print the PicCollage on a poster maker to share with the grade level or the whole class. The students can share group posters or individual posters of the different types of homes. Another idea to use these collages for engagement is after sharing the collages, the students can classify each type of home into categories based on individual criteria created by the student.
There are many different ways you could use this app with many different levels of students. The possibilities are endless! This app is a simple tool that will lend itself to many different first grade activities throughout the year and across the curriculum. The more you use it, the easier it will be to use. This is a great introduction to other technology apps that use photos such as ThingLink, Book Creator, Little Story, MyCreate, and Chatterpix. Have fun learning with photos.
In Unit 8 of Imagine It! students are learning about plants - their parts, needs, life cycle, adaptations, and uses. This blog will include three different activities that allow students to present what they have learned about plants. Each activity encourages students to conduct their own research and work collaboratively to create a finished product using a variety of educational technologies.
Using Text Features with Thinglink
You can introduce Thinglink to your students in a variety of ways.
A fun activity is to have students take a picture of them and a partner and write one thing about them. (ie. My name is Johnny and I am 6 years old). Here is an example of a Thinglink activity to help them get comfortable identifying and labeling pictures using the app.
We all have early finishers who sit and wait patiently. Rather than give them MORE work, a great stretch activity for “high-flyers” could be students drawing their own plant to label and describe or have them research a plant we have not discussed. To complete this task, students would use their own blank piece of paper to draw their own plant. After drawing, they will upload their picture into Thinglink. The students will then label the plant, and add their videos to describe each of the purposes of the plants.
A good way to help struggling students would be allowing students to use a poster or the teacher could already have the name of the plant part on it.
When exploring the theme “I Think I Can” we explored how we could try our best and never give up. This blog will show you three activities and some bonus ideas to incorporate technology into this unit. In this unit we are using two apps. The first is Pic Collage and we will be making a picture collage of images. The second is Book Creator. We will be making a scrapbook to describe the characters’ feelings and actions or compare and contrasting characters’ experiences to those of the reader.
Our activities are connected to each other to have a final result of a scrapbook responding to the characters’ actions and feelings connected to the text as well as to the reader. These activities can be completed in a few different ways. You can work independently, use shoulder partners, or work as a table group to complete the scrapbook. Brainstorming with PicCollage
In Imagine It Unit 6: North, South, East, West, students are going to be learning about maps and globes, and how to find their way around the world. In this blog, you will find an activity for the beginning, middle, and end of the unit .
Compass Rose Seesaw Workstation
In this first Seesaw activity, students will practice directional words by placing different shapes on a compass rose when given a specific direction. Instead of up, down, right, and left, make way for North, South, East, and West! Here is a quick glimpse!
Prior to the activity, you will need to have created a class in Seesaw. This can be done online, or in the app. Also, make sure that the Seesaw app is downloaded onto the iPads that your students will be using. You will also need to print out a compass rose and task card. If you have never used Seesaw or need some refreshing, check out this tutorial. For another helpful resource, check out the First Grade Getting Started Guide. 
After you have created your class and downloaded the app onto the iPads, you are now ready for the next step! Post the Compass Rose activity to your class in Seesaw. Here are the steps on how to post the activity to your class.
For this task, students will use the Seesaw app to practice following directions and using directional words (North, South, East, and West). Students will work with a partner, and take turns giving directions and drawing shapes on a compass rose. One student will tell their partner to draw a shape (triangle, circle, square, or heart) in a certain place on the compass rose. For example, they could say something like “Draw a triangle to the North”. Then, it will be their partner’s turn. Partners will continue to take turns. If technology is unavailable, students may use a slate and markers or paper and pencil. The Imagine It Unit 5: What’s the Weather introduces your students to stories about different types of weather. Seesaw Writing Warm-UPStudents will begin the unit with a warm up activity using the Seesaw app or website that can be completed in workstations. To learn more about Seesaw, click here or access a the Getting Started guide here. You will need to add the SeeSaw Unit 5 Warm Up Activity into your own activity library for students to access. During this workstation activity, they can choose a type of weather they know about and write three sentences describing the weather. If some are struggling with writing sentences, they can write adjectives. Click here for the task card that can be put in the workstation to direct your students through the activity.  Example of a completed activity in Seesaw *Once they have completed their activity digitally and you have approved it, students can comment positive feedback on their peers work. Share tips with students on how to comment appropriately. Be sure you have this feature turned on in the settings.
If you do not have access to technology, here is the template to print out and complete offline.
In the Our Neighborhood at Work unit, students learn about different types of jobs and the interdependence upon each other in a community. This blog includes three activities. Each activity builds upon the previous activity and takes students through the inquiry process to develop a completed project to conclude the unit. Activities can be completed whole group, small group, or independently with many different differentiation options.
Padlet Brainstorm - Inquiry/Flex
After introducing the unit and reading What I Want to Be, students will begin the inquiry process by brainstorming a career they are interested in and responding with a sentence or question on a virtual bulletin board called Padlet.
Padlet is an online virtual “bulletin” board, where students and teachers can collaborate, reflect, and share links and pictures in a secure location. If students in your class have never used Padlet, here is a getting started lesson. This Getting Started Padlet Tutorial will assist you with familiarizing yourself with Padlet’s layout, creating a discussion thread, and sharing the discussion with your students.
Create your Padlet class on the web, in the Padlet app, or use this ready-made Padlet. If you choose the ready made Padlet, you can click “remake” in top right corner and a copy of the Padlet will be added to your account. This will ensure you only see your class/students' responses.

Students can post to Padlet using iPads after reading the text as a response within their table groups or with a shoulder partner. This activity can also be used in workstations. If you decide to use this activity during workstations, be sure that Padlet has been downloaded to all student devices. You can use this task card for students to complete a post in Padlet independently.
If the teacher doesn’t have access to iPads, Padlet is also available on the web or here is the lesson without technology. More advanced students can add a photo to their post or more than one sentence or question. In the I Am Responsible unit, students learn about being responsible at school, home, and in the community. This blog includes three activities related to the unit that connect to a specific literacy standard, communication standard, and technology standard. The activities incorporate the use of technology as a tool for the students to showcase their ability to proficiently create a writing response, sequence events, and compare and contrast throughout the unit. Seesaw Responsibility - WritingAfter introducing what it means to be responsible, students will begin the first activity by brainstorming how they show responsibility at home, school, or in the community. Students will engage in an cooperative learning structure, Stand Up, Hand Up, Pair Up for students to share one way they personally show responsibility with a partner. Once students finish sharing, they will complete a writing activity. They will use the Responsibility Writing Template to draw a picture of them showing the responsible act they shared with their partner, and complete the sentence stem, “I am responsible when___.”
For students to complete this task digitally using Seesaw, click on the Seesaw activity link here. If you would like more information about getting started with Seesaw, click here.
After all students submit their responses to Seesaw, the teacher can have students listen and respond to other students using Seesaw or pull up the responses on the Smartboard and allow students to share their writing with the class. *Teacher Tip: If a student is unable to write independently they can illustrate a picture showing responsibility and record a description of their picture. If you do not have enough technology devices for students to respond in during writing, have students upload and record during workstation time.
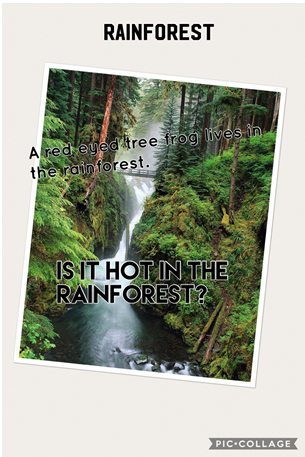
In the unit Where Animals Live, students learn about animal habitats. Students will be exposed to stories that describe various habitats and animals that live there. The stories help students understand how each habitat has specific features that make it a good home for an animal. Students will complete the 3 activities below throughout the unit. Their goal by the end of the unit will be to create a digital presentation that visually shows their habitat, its features, and animals that live there. It will include three new facts that students will find as they complete each activity. Students will be asking and answering questions while they read and find new information. They will also be learning that the internet and other digital resources can be used as tools to find new information.
Blendspace - Whole Group
Use the digital tool called Blendspace to introduce the unit “Where Animals Live!” and supply a brief summary of what a habitat is. Blendspace is a place where teachers can easily find, add, and share online content (videos, images, PDFs, Google docs). Students can comment or take notes alongside content.
To learn about animal habitats, show students videos about what a habitat is, as well as specific animal habitats. (I.E Desert, Polar, Rainforests, Grasslands) use this collection of videos located on this Blendspace. 
Students should then be placed in groups of 4 and each group will choose a habitat they would like to learn more about (or the teacher can assign groups a habitat). The teacher may choose to show entire videos or clips from the videos provided. The teacher may also pull in any texts they have that connect to habitats.
*If you do not have enough iPads for this activity, students can use the strategy Jot Thoughts on sticky notes or paper to collect ideas. Students can add images of their thoughts in rotations to their collage on limited devices.
During the Back to School Unit, students will explore various topics about schools here and around the world. Included in this blog are three activities that can be used throughout this unit in whole group, small group, and/or workstations.
EPIC! - Workstation
After reading, both students will complete their own graphic organizer which has them illustrate their favorite part of the story. Partners will share their illustrations by verbally describing their favorite part while their partner listens and records their presentation using the Seesaw app. Click here for a tutorial on Seesaw.
Graphic organizers are a great way for students to record and respond after reading a text. You can use different books or change the graphic organizers in order to practice and assess different comprehension skills and strategies. (ex: compare and contrast, main idea and details etc.) Below are two graphic organizers you can use for this task.
Click here to access a student friendly task card. Since this activity falls during the first few weeks of school, feel free to adapt this activity to whole group or small group. The teacher could read aloud or play the books out loud when technology is not available. To adjust for high flyers students may illustrate their favorite part, as well as, write sentences describing their illustration.
|


 RSS Feed
